 Save
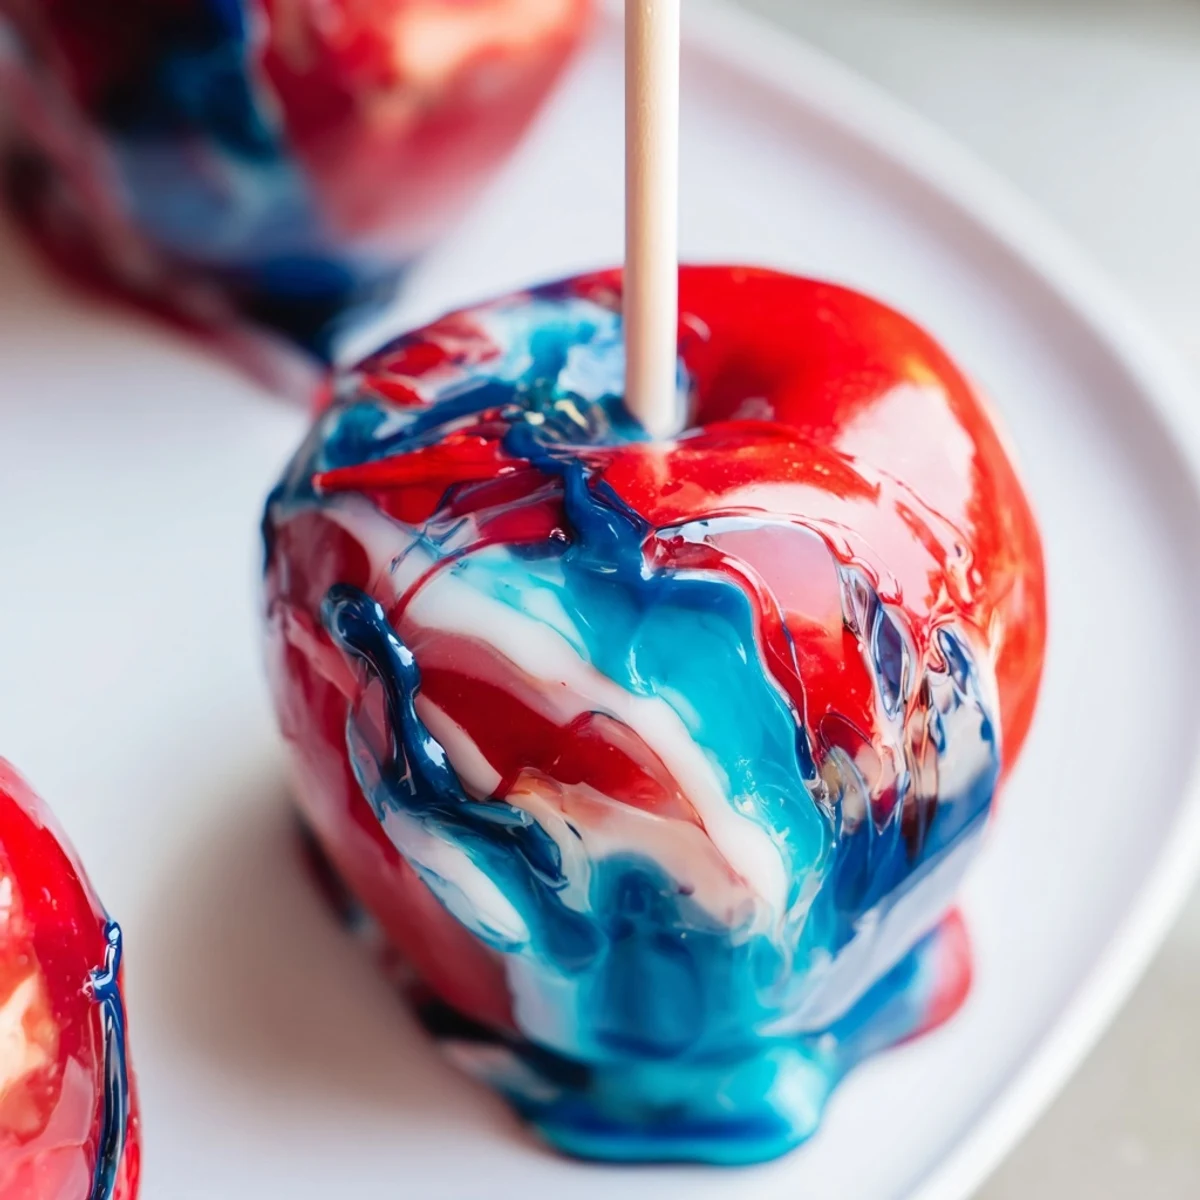
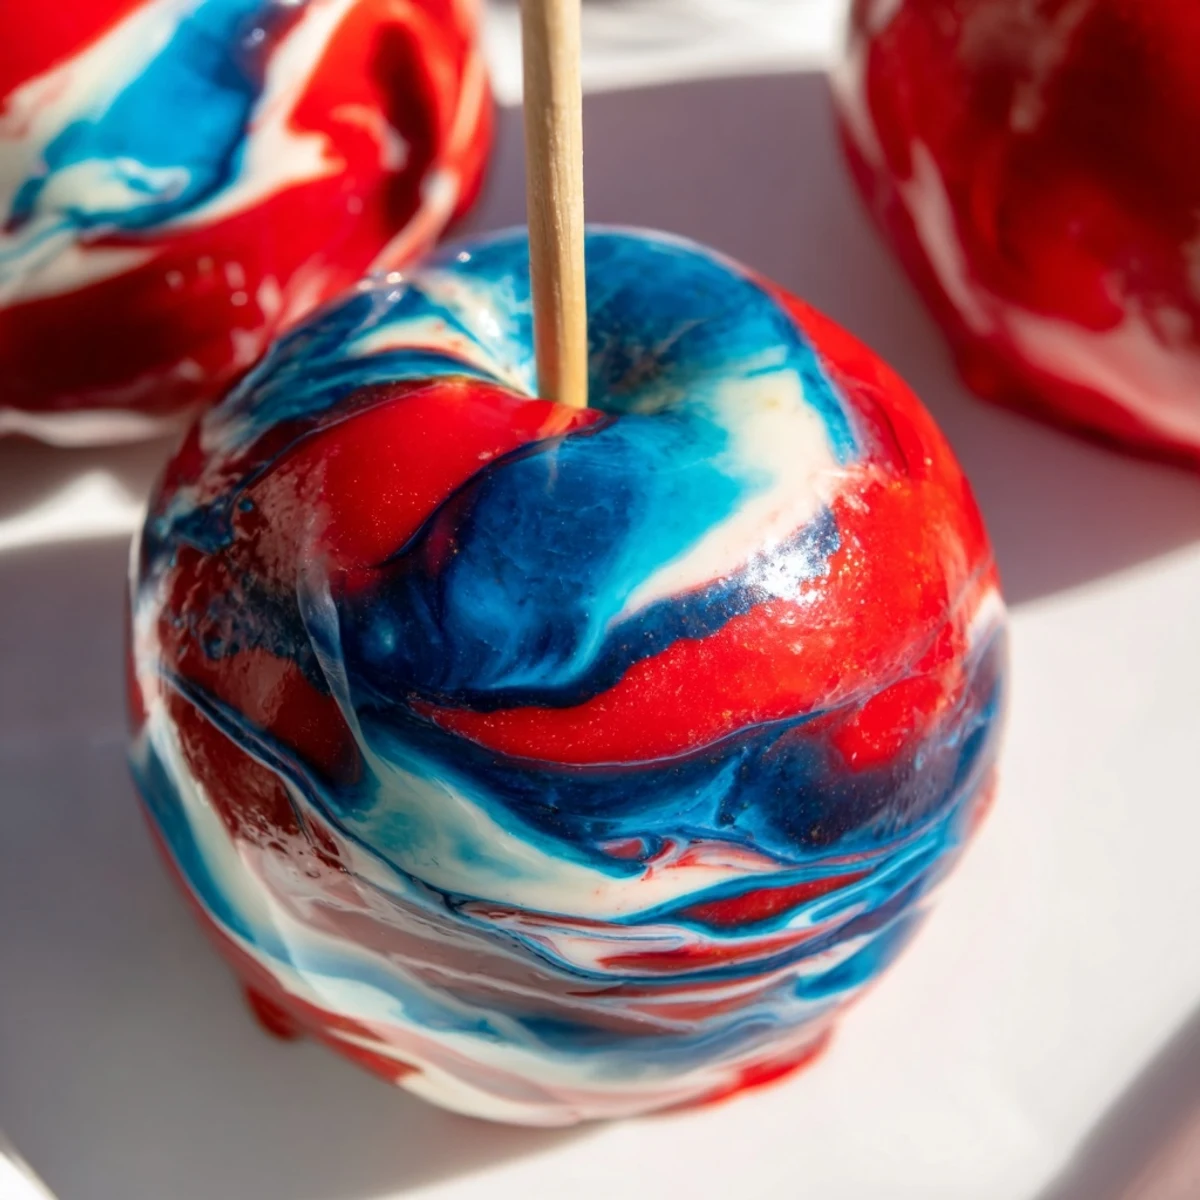
Save These marbled candy apples feature crisp apples coated in a glossy, vibrantly swirled candy shell. The technique involves creating a hard candy coating with sugar, corn syrup, and water, then adding gel food colorings in streaks rather than mixing completely. Each apple gets individually dipped to create unique marbled patterns, resulting in beautiful, festive treats perfect for parties and holidays.
The process requires careful temperature control to reach the hard crack stage (300°F), and working quickly once the syrup is removed from heat to preserve the marbled effect. Gel food coloring provides the most vibrant, distinct marbling compared to liquid varieties. These treats store well at room temperature for up to 24 hours, making them convenient for advance preparation.
The candy thermometer clipped to my pot showed exactly 300°F, but what made these apples magical wasn't just the temperature—it was the way those gel colors swirled together like edible stained glass. My kitchen smelled like caramelized sugar, and I couldn't stop grinning as each apple emerged looking more like a galaxy than a dessert.
I brought a batch to my niece's fall birthday party last year, and honestly, the kids went quieter than I've ever seen them—just staring at these swirling, shimmering apples like they held some kind of secret. One little boy told me mine tasted like aunicorn ate a rainbow, which I'm pretty sure is the highest compliment a seven-year-old can give.
Ingredients
- 8 medium apples: Granny Smith gives you that perfect tart crunch against the sweet candy, but Fuji works beautifully if you prefer something naturally sweeter
- 8 sturdy wooden sticks: Slide them in where the stem was, and wiggle slightly to secure without splitting the apple
- 2 cups granulated sugar: This creates your canvas, so don't skimp—the sugar shell needs thickness to crack satisfyingly
- 3/4 cup water: Just enough to dissolve everything before the real chemistry happens
- 1/2 cup light corn syrup: The secret ingredient that keeps your candy shell glossy instead of grainy
- 1/2 tsp vanilla extract: Optional, but it adds such a lovely warmth behind all that sugar
- Gel food coloring in red, blue, and white: Gel is absolutely non-negotiable here—liquid coloring will seize your sugar mixture into a grainy disaster
Instructions
- Get your station ready:
- Line a baking sheet with parchment or a silicone mat, then press those wooden sticks firmly into each apple where the stem used to be—wiggle gently until they feel secure and sturdy.
- Dissolve the sugar base:
- Combine your sugar, water, and corn syrup in a heavy-bottomed saucepan over medium heat, stirring gently until everything dissolves into a clear liquid.
- Reach the hard crack stage:
- Crank the heat to high, stop stirring completely, and let it bubble away until your thermometer hits exactly 300°F—this usually takes about 15-20 minutes of patient watching.
- Create the marble magic:
- Remove from heat immediately, stir in vanilla if using, then add drops of each gel color right on top of the sugar. Take a wooden skewer and gently swirl through the syrup just once or twice—you want distinct streaks, not a fully mixed color.
- Dip and twirl:
- Working quickly before the sugar thickens, dip each apple while holding the stick, rotate to catch those beautiful swirling patterns, and let the excess drip off for a moment before setting it on your prepared sheet.
- Let the candy shell set:
- Leave the apples undisturbed for about 15 minutes until the coating is completely hard and glossy to the touch.
 Save
Save Something surprisingly meditative happens during that 300°F wait, watching the bubbles grow slower and more golden as the sugar transforms. My friend Sarah said these apples reminded her why she loved being a kid in the first place—the simple joy of something beautiful you can hold in your hand and eat.
Working With Hot Sugar
Sugar burns are no joke, and that syrup stays dangerously hot well after you pull it off the stove. Keep a bowl of ice water nearby just in case, and remind anyone watching that the pot is absolutely off-limits. I've learned to work deliberately rather than rushing—those extra seconds of care save so much trouble later.
Color Combinations Worth Trying
Red, blue, and white creates that classic galaxy look, but you could also do purple, pink, and white for something dreamy, or orange, yellow, and red for autumn vibes. The key is using colors with enough contrast to show those gorgeous streaks—similar shades will just blend together into something muddy.
Making These Ahead
These are best served within a few hours of making them, since humidity and time both conspire to make that perfect crack turn sticky. If you need to prep ahead, make them the night before and store them individually wrapped in wax paper or cellophane bags at room temperature.
- Avoid the refrigerator entirely unless you want sad, weeping candy shells
- Place each finished apple in a cupcake liner to prevent sticking to your serving surface
- Position sticks upright by nesting them in a jar of dried beans while they set
 Save
Save There's something deeply satisfying about making something so stunning from such humble ingredients. Hope these bring a little extra magic to your table.
Recipe FAQs
- → What type of apples work best for candy apples?
-
Medium-firm apples like Granny Smith or Fuji work best as they hold up well to the hot candy coating without becoming mushy. Make sure apples are thoroughly dried before dipping to ensure proper candy adhesion.
- → How do I achieve the marbled effect?
-
Add a few drops of different gel food colorings to the hot candy syrup, then gently swirl with a skewer without fully mixing. The goal is to create visible streaks that will transfer to each apple during dipping.
- → What's the hard crack stage and why is it important?
-
The hard crack stage occurs at 300°F (150°C) when the sugar syrup becomes brittle. This temperature is crucial for creating a hard, shiny candy shell that will set properly and not remain sticky.
- → Can I use liquid food coloring instead of gel?
-
Gel food coloring is recommended for the most vibrant, distinct marbling. Liquid coloring can make the syrup too thin and may not create the same striking visual effect.
- → How long do these candy apples last?
-
Finished candy apples can be stored at room temperature for up to 24 hours. The candy shell will harden and become crisp, while the apple inside remains fresh.
